Introduction
![]()
![]()
![]()
![]()
This is a simple drum machine / loopstation. It's made for three hand-wound solenoids mounted to a tambourine. It is controlled by a Raspberry Pi Pico on a custom PCB.
See this blog post for some more context.
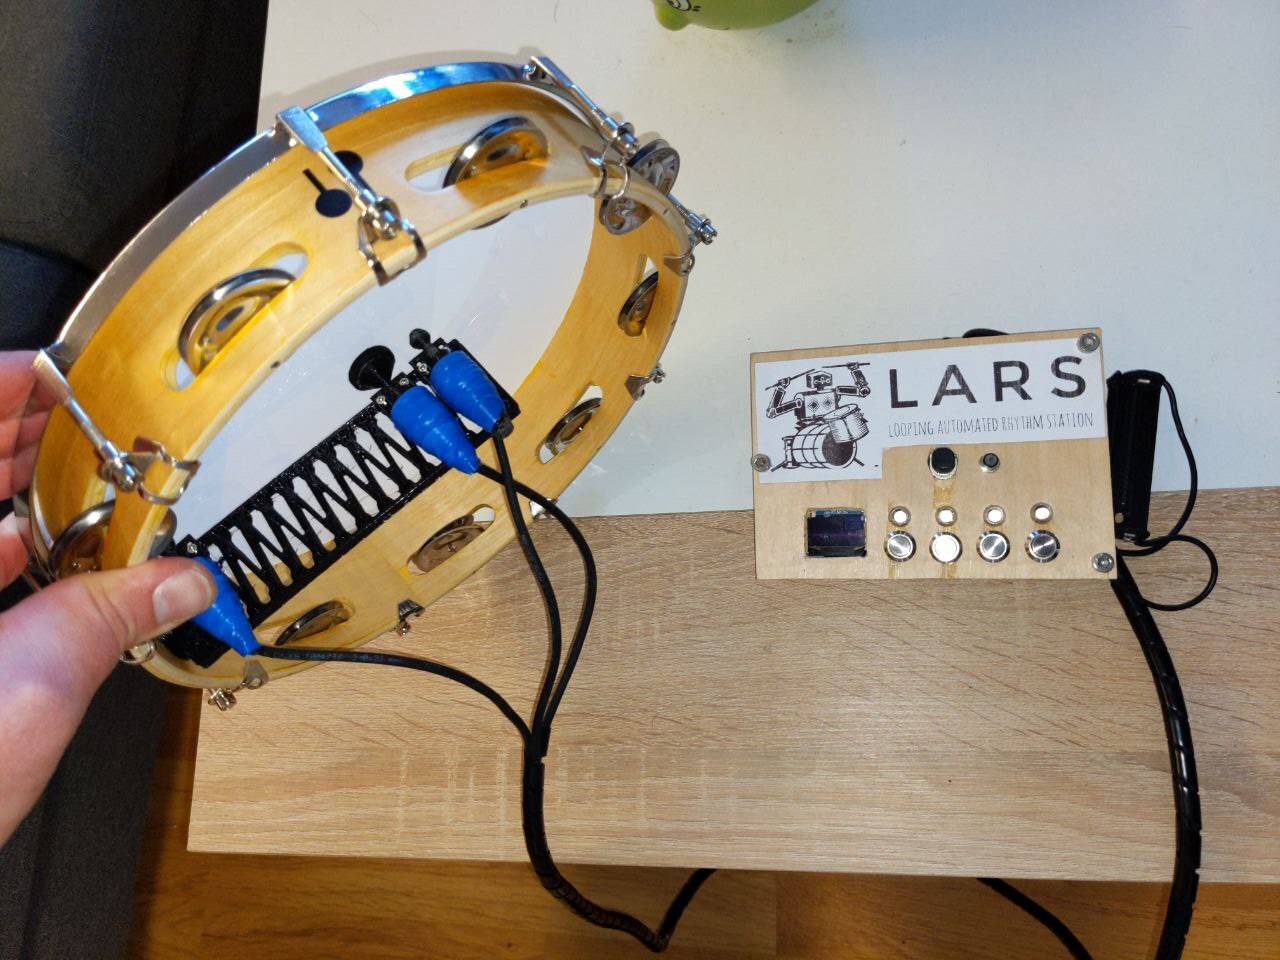
Prototype
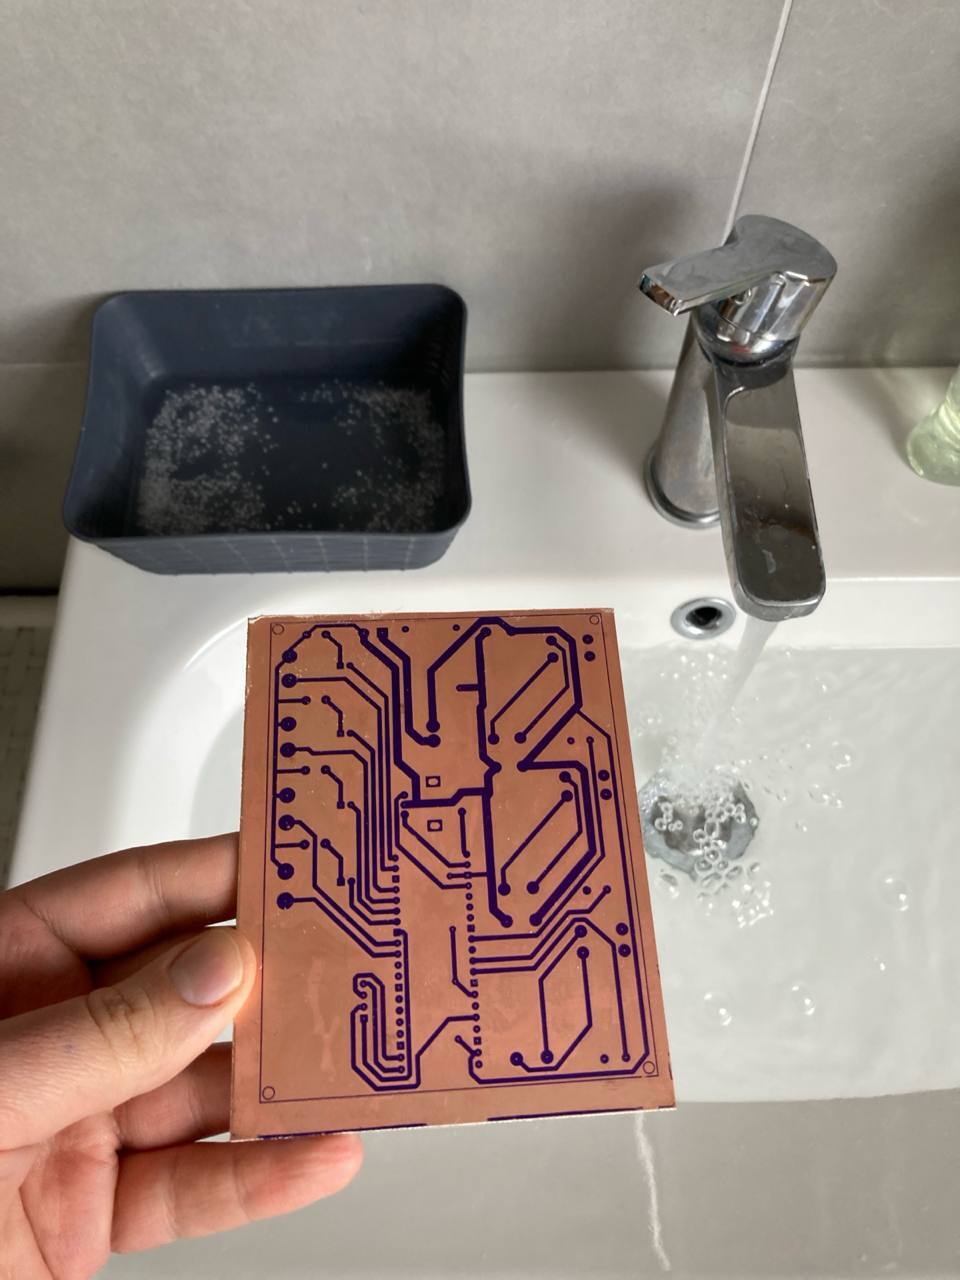
This is the hardware design for the initial prototype gifted as a birthday present. It's a single sided PCB layout suitable for hand etching at home.
You can also download the Gerber files to order PCBs online.
Bill of Materials
These are all the parts required to assemble the prototype.
| ID | Type | Link |
|---|---|---|
| U9 | Raspberry Pi Pico | Reichelt.de, Amazon.de |
| U2 | TP4056 Charger Module | Amazon.de |
| U4, U6, U8 | MOSFET Module N-Channel | Amazon.de |
| U3, U5, U7 | Step-Up Converter Module | Amazon.de |
| J2 | SSD1306 128x64 0.96" Display | Amazon.de |
| S1 | ALPS EC12E24244 | Reichelt.de |
| - | Cap for encoder knob | Reichelt.de |
| D1 - D4 | LED 5mm | Reichelt.de |
| D5 - D8 | 1N5819 Schottky Diode | Reichelt.de |
| R1 - R4 | Resistor 1k Ohm | Reichelt.de |
| R5 | Resistor 10k Ohm 0.1% Axial | Reichelt.de |
| R6 | Resistor 18k Ohm 0.1% Axial | Reichelt.de |
| SW1 - SW4 | 12mm waterproof stainless steel push button | N/A |
| SW5A | Unknown Power Switch | N/A |
Prototype Schematics
This page shows the current version of the schematics as SVG graphics.
You can also view the schematics as PDF.
drumkit
Prototype PCB Layout
This page shows the current version of the PCB layout as SVG graphics.
You can download the Gerber files to order PCBs online.
2D PCB Layout
You can also view the 2D PCB layout as PDF.
DIY Version
The DIY version is suitable for etching at home, it only needs the bottom copper layer. Be aware that there is one track on the top layer, for a safety diode that was added later. This connection should be done with a wire by hand.
You can also view the DIY layout as PDF.
3D PCB Layout
Status: "Preparing 3D model..."
LARS V2
This is the second iteration of the hardware. The principle is the same as for the prototype, with the same chinese modules used. Only the buttons have been changed, and there are now 9 of them, with 8 LEDs. The battery is now mounted on the board. It is planned to be used without a case.
You can download the Gerber files to order PCBs online.
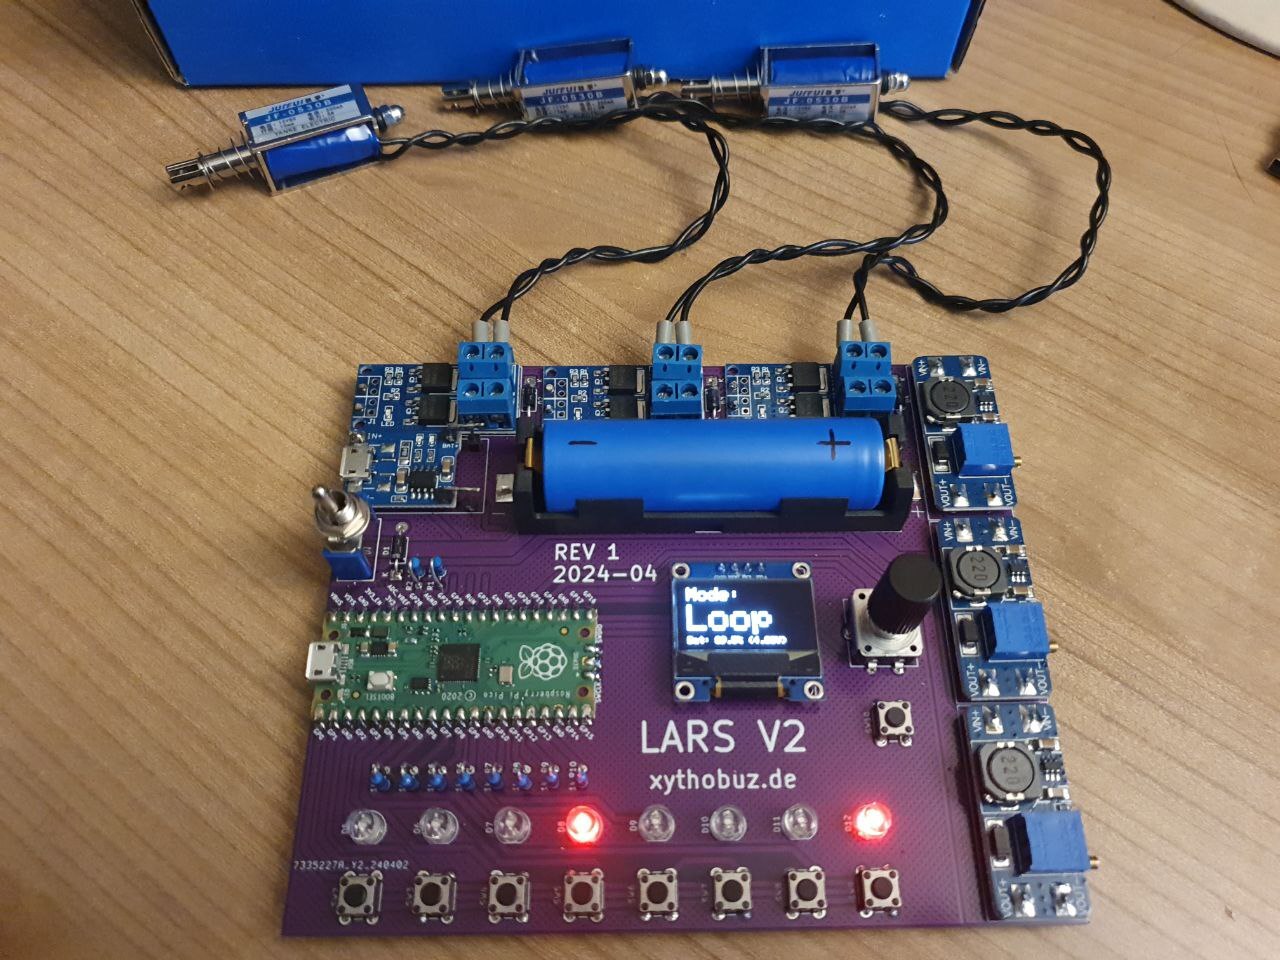
Revision 1 was using the SMD-only footprint for the Raspberry Pi Pico. Revision 2 has changed this to be compatible to THT as well.
Warning: Revision 1 and 2 are missing diodes on the button matrix. So when holding down three or more buttons simultaneously you get ghosting on other buttons.
Depending on the solenoids you may reach a situation where not all channels can be properly triggered simultaneously.
To Do: try to improve this by adding more capacitance to the power rail or between the voltage regulators and the mosfets?
Bill of Materials
These are all the parts required to assemble the V2 PCB.
| ID | Type | Link |
|---|---|---|
| U1 | Raspberry Pi Pico | Reichelt.de, Amazon.de |
| U2 | TP4056 Charger Module | Amazon.de |
| U3 - U5 | MOSFET Module N-Channel | Amazon.de |
| U6 - U8 | Step-Up Converter Module | Amazon.de |
| OLED1 | SSD1306 128x64 0.96" Display | Amazon.de |
| BT1 | Keystone 1042 | Reichelt.de |
| S1 | APEM 5236AB | Reichelt.de |
| SW1 | ALPS EC12E24244 | Reichelt.de |
| - | Cap for encoder knob | Reichelt.de |
| SW2 - SW10 | DIP 6x6mm push button | Reichelt.de |
| D1 - D4 | 1N5819 Schottky Diode | Reichelt.de |
| D5 - D12 | LED 5mm | Reichelt.de |
| R1 | Resistor 10k Ohm 0.1% Axial | Reichelt.de |
| R2 | Resistor 18k Ohm 0.1% Axial | Reichelt.de |
| R3 - R10 | Resistor 1k Ohm | Reichelt.de |
LARS V2 Schematics
This page shows the current version of the schematics as SVG graphics.
You can also view the schematics as PDF.
lars2
LARS V2 PCB Layout
This page shows the current version of the PCB layout as SVG graphics.
You can download the Gerber files to order PCBs online.
2D PCB Layout
You can also view the 2D PCB layout as PDF.
3D PCB Layout
Status: "Preparing 3D model..."
3D Print - Solenoids
This page shows the 3D printed parts for the solenoid actuators.
The dimensions for the parametric OpenSCAD settings for these generated STL files should match what we used for the prototype. For your own build you may need to get the OpenSCAD sources from the repo and tweak the values.
Actuator All
Status: "Preparing 3D model..."
Actuator Cap
Status: "Preparing 3D model..."
Actuator Hammer
Status: "Preparing 3D model..."
Actuator Spool
Status: "Preparing 3D model..."
3D Print - Tambourine
This page shows the 3D printed parts to mount solenoids to a tambourine.
The dimensions for the parametric OpenSCAD settings for these generated STL files should match what we used for the prototype. For your own build you may need to get the OpenSCAD sources from the repo and tweak the values.
Beam
Status: "Preparing 3D model..."
Tamb Mount All Visualize
Status: "Preparing 3D model..."
Tamb Mount Inner
Status: "Preparing 3D model..."
Tamb Mount Outer
Status: "Preparing 3D model..."
3D Print - Prototype
This page shows the 3D printed parts for the prototype PCB.
The dimensions for the parametric OpenSCAD settings for these generated STL files should match what we used for the prototype. For your own build you may need to get the OpenSCAD sources from the repo and tweak the values.
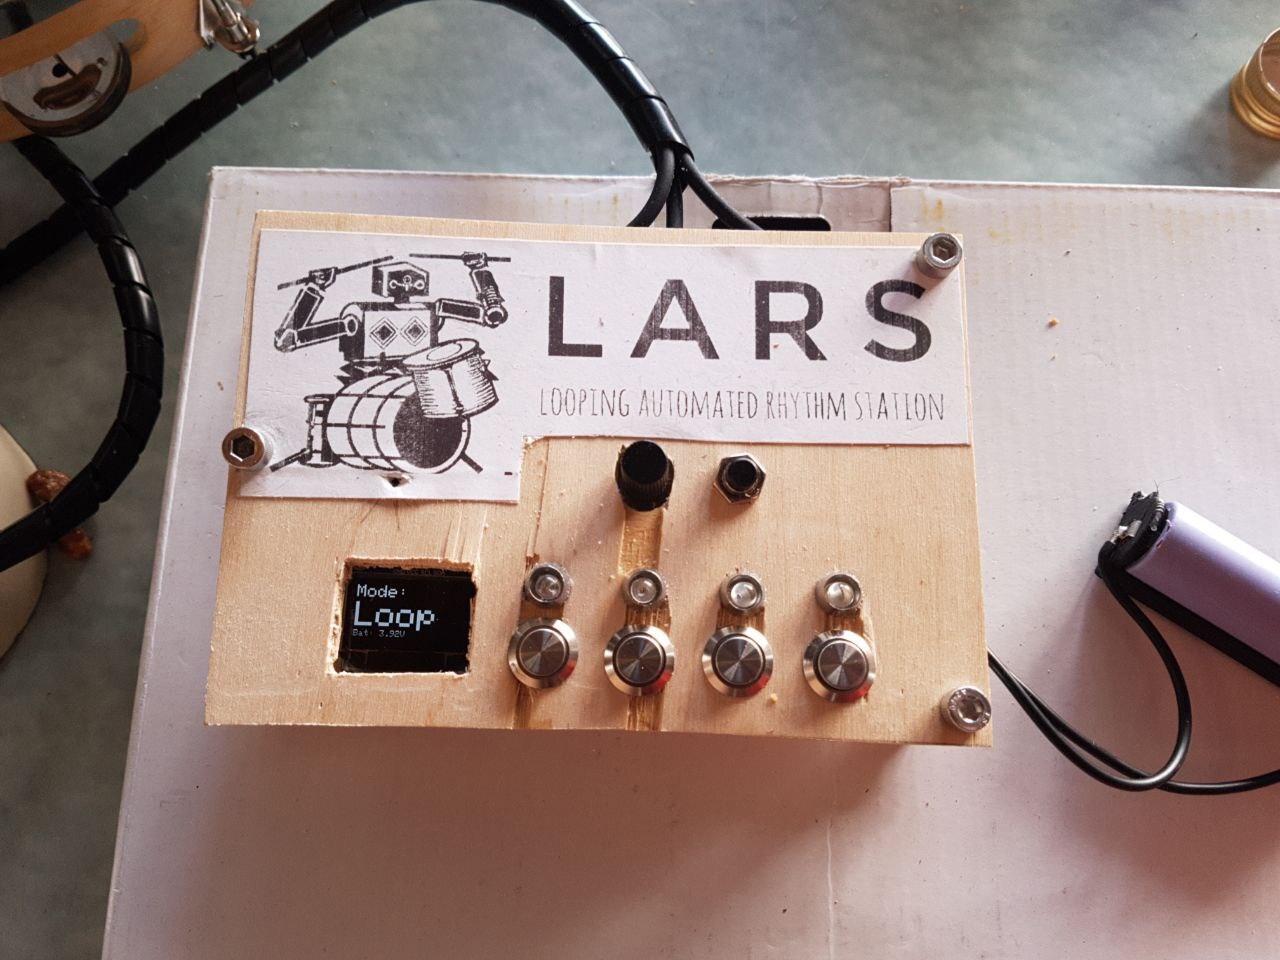
Enclosure Bottom
Status: "Preparing 3D model..."
Enclosure Top
Status: "Preparing 3D model..."
Enclosure Faceplate
Status: "Preparing 3D model..."
Usage Guide
Turn on LARS using the power switch on the PCB.
In normal operation, the bottom of the display always shows the battery level in percent, and the voltage. Take care to turn off the device and recharge it when the percentage reaches zero!
The top of the screen shows the currently selected setting and its value. Press the encoder to switch to the next available setting, or turn the encoder to change the value of the currently selected setting.
The available settings depend on the current mode. Take a look at the sub-page for each mode for details.
You can hold down some buttons while powering on the device to get different effects:
- hold the
Clearbutton to enter the configuration menu - hold the encoder
Clickbutton to show version information of the firmware - hold both
ClearandClickto enter the button test mode - hold any combination of three buttons to skip the boot animation
Loop Station
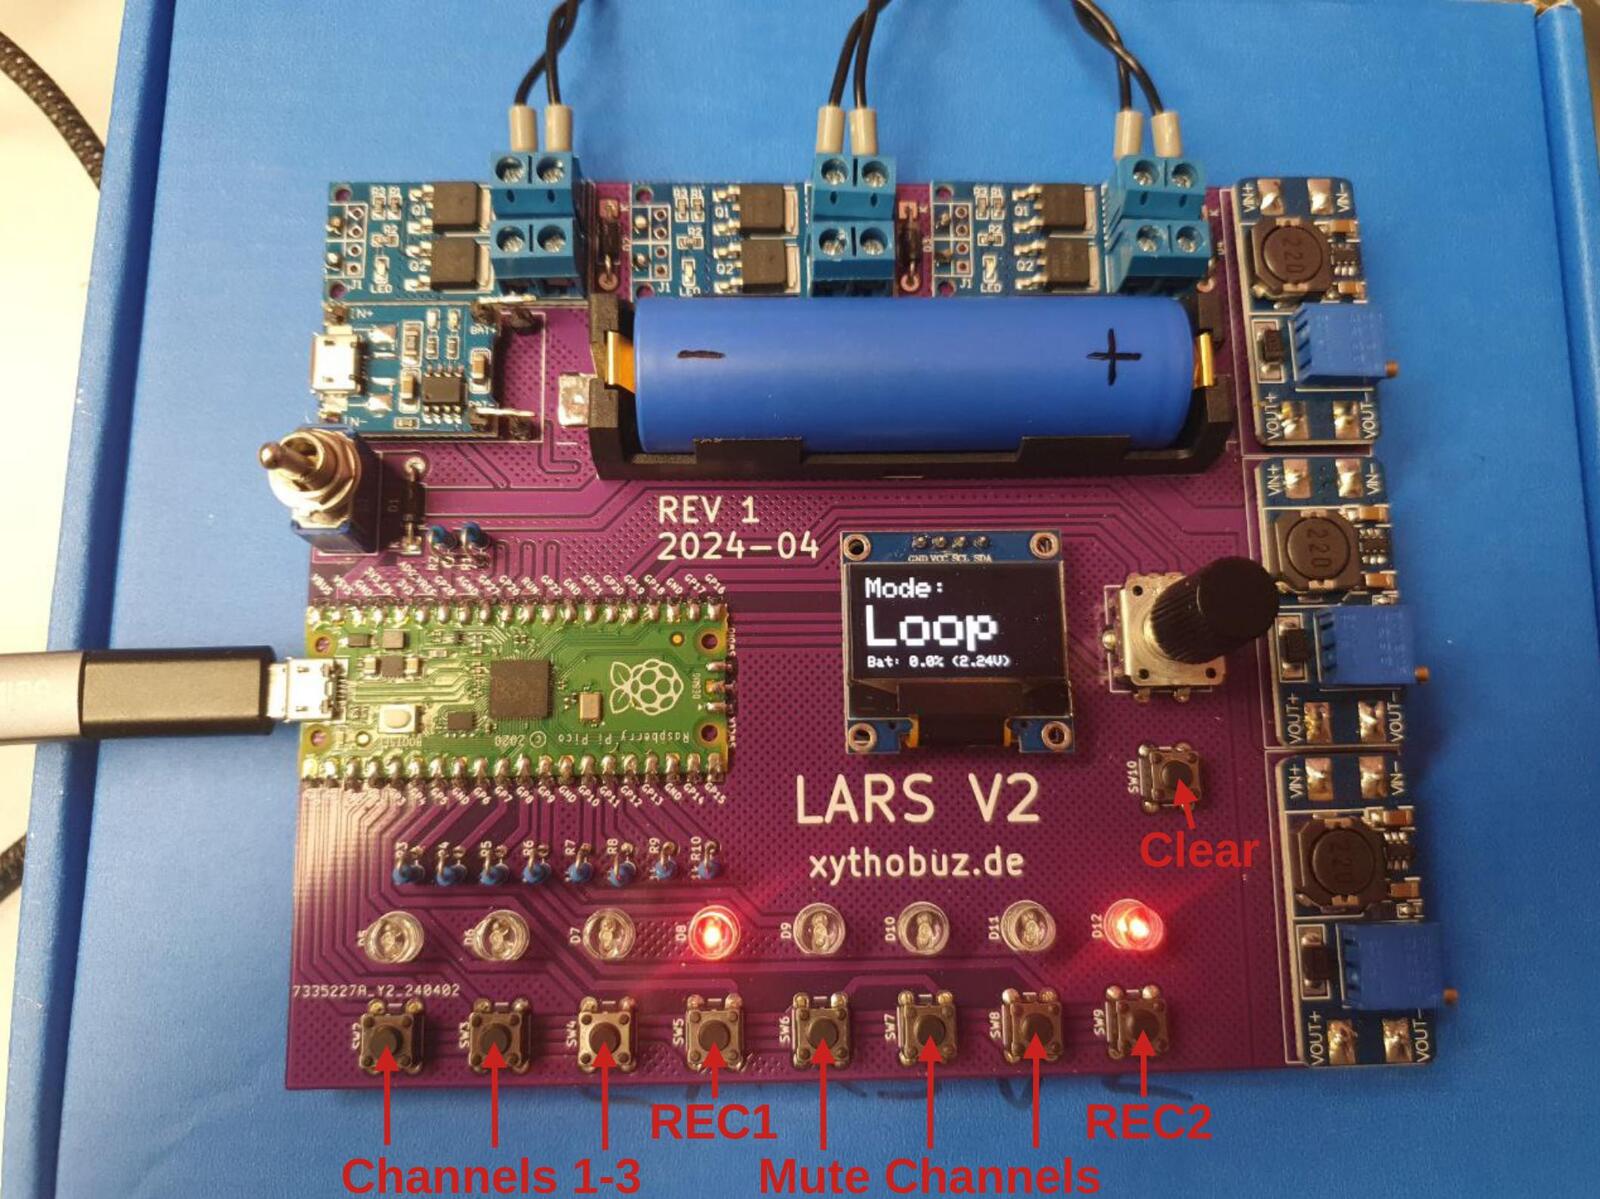
In this mode the first three buttons play each corresponding output channel.
The fourth (and eighth) button, with the LED always lit, is the record button. Hold it down for a while and release it to set the length of the loop.
Notes played while the record button is held will be looped.
The fifth, sixth and seventh buttons are channel mute buttons. While holding these down the corresponding channel will not play any notes.
The top-right button below the encoder clears the recorded loop in different ways:
- Pressing it on its own will clear all channels of the current loop, keeping the set length.
- Pressing it while holding down one of the channel mute buttons will clear only this channel in the current loop.
- Pressing it while holding down the left REC button will clear the current loop, including the length.
- Pressing it while holding down the right REC button will clear all loops in all banks.
You can modify the loop length using the encoder menu.
The encoder menu also provides a way to switch between different loop banks.
With the Sel-Bnk menu you can switch to another loop bank.
With the Cpy-Bnk menu you can copy the current loop to another bank and switch to it.
Drum Machine
The drum-machine runs through a sequence of a given length, set by the Length menu.
The corresponding LED lights up at it's moment in the sequence. The currently active "step" is fully bright while enabled ones are lit dimly.
Change the speed the sequence is running at with the BPM setting.
If you have selected a Length that is longer than the available number of buttons / LEDs, you can switch your "window" of the sequence using the Bank setting.
Select the currently edited output channel with the Channel menu.
Use the CLEAR button below the encoder to zero-out the currently selected channel.
MIDI
The MIDI mode is only available when a computer is connected via USB to the Raspberry Pi Pico.
You only have two settings in this mode, the receive and transmit MIDI channels, ranging from 1 to 16.
Notes received on the selected Rx channel will be played on the output channels. Velocity is ignored.
Any pressed note buttons are sent on the selected Tx channel.